Tuesday, February 14, 2012

How to add switchable subtitle to video


Hi all :)

in this post i will show you how to add switchable subtitle to video very fast, and the watch your video on a divx player.

Tools you need:

AVIAddXSub
http://www.mediafire.com/?bdtwhab9wb1oa94

Time nedded:

Just 2 minutes!

Introduction:

This program simplifies the task of incorporating subtitles (XSUB) in AVI files with DivX/XVid video streams. Subtitles are provided by .srt ANSI text files and/or one idx/sub pair (for a total of up to 8 per avi).
Alternativelly you can convert the .srt to idx/sub files to subtitle AVI/MKV/MP4 etc. Choose what works best with your DivX/XVid Player.
Place the avi file and its assosiated (same name) srt or idx/sub in the same directory. Select the avi (or many) and press "Start". A subtitled divx file (or many) will be created (<2 min), ready to play in your DivX player.
Similarly, if you choose idx/sub generation, one idx/sub files pair will be created from the provided srt file(s) and you can place it together with the avi for playback in your DivX/XVid Player.TIP: You can Drag&Drop the avi (or many) to program's shortcut in your desktop.

Tutorial:

Open AVIAddXSubs.exe, and the hit configuration 1 tab


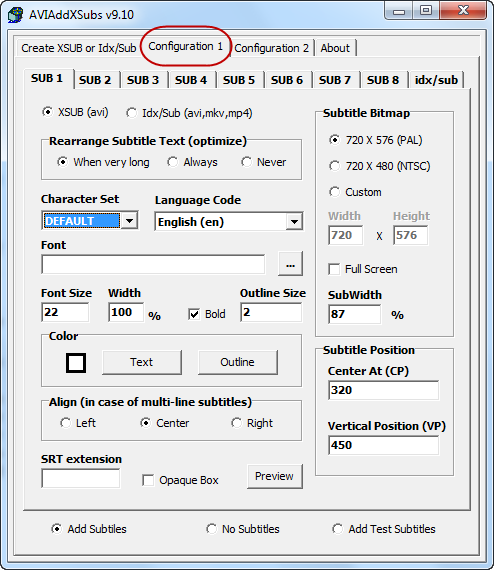
As you can see, there is 8 tab for 8 switchable subtitle you can add, this become very useful if you want to add more than one language, so in SUB 1 tab you can add English, and in SUB 2 you can add Germany language and so on.

You can change the font, size and color of the subtitle as you like, when you finished customized your configuration make sure your subtitle and your video are in same directory and have the same name, please look at the picture below!


Now we are ready to add the subtitle, just follow the simple steps :)


Then choose the video you want to add subtitle to, but make sure the subtitle have the same name of the video, then choose your output destination and click start!

Wait less than 2 minutes and your output video will be ready :)

Good Luck!


Monday, February 6, 2012

How to use Dropbox


Hi all!

If you search the internet you can find a lot of sites to share or save your files, but asked yourself: what if I upload a private files and someone have an access to it!

So today I like to share with you how to use Dropbox, very useful way to save your private files, backup important files or move your files.

Download Dropbox:


Features of Dropbox:

·         You can bring your photos, docs, and videos anywhere

·         Your files are safe

·         You can share easily with friends, family and teammates

·         Free for Windows, Mac, Linux, and Mobile

How to install and use Dropbox:
http://www.youtube.com/watch?v=gbXj1l1YXFk

Sunday, February 5, 2012

How to encode HD anime

Hi all! :)

In my first post I would like to share with you how to encoding anime videos for beginner users.

In this guide, i will use MeGui, there is a lot of encoding programs, but i recommended MeGui, specially for beginner users, because it's easy to use and give a high definition episode with cool size.

Also i will show you a basic command to help you to create basic & good AVS scripit

Tools You need:
  1. MeGUI, Download it.
  2. Combined Community Codec Pack , Download it.
  3. Custom  MeGUI profiles, Download it.
  4. AvisynthDownload it.
  5. Nero AAC Codec, Download it.
  6. Any anime episode.
You can download all tools above .zip file form here, Download it.

How we will do it!

1- Setup Combined Community Codec Pack:

    In this setup will setup Combined Community Codec Pack, it's very easy step.


I recommended full installation, because it will give you all the features


I recommended the default settings

I change file association settings, and i choose to play all my videos with media player classic, you can choose "no change", to play your videos with you default video player

 2- Setup Avisynth:


Choose full type of setup


3- Setup  MeGUI : (important step)

     This step is very important, so bring a cup of coffee and try to give your best :)
  1. First extract MeGUI_2106_x86.zip to any folder you want. 
  2. Open MeGUI application.
  3. It will show automatic update, wait until the update is finish.
  4. Restart  MeGUI.
Now we will add Nero AAC Codec to MeGUI:


  1. Open MeGUI.
  2. Click Option.
  3. Click Settings.
  4. Click External program settings.
  5. Then add Nero AAC Codec.

Now we will import Custom  MeGUI profiles: